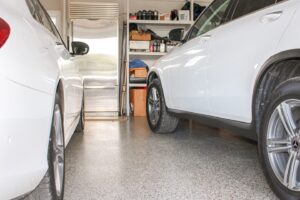
Epoxy and polyaspartic floor coatings can transform garages and basements with concrete floors, making them more comfortable, easier to clean, and much more durable than bare concrete.
But where to begin? How do you install an epoxy floor (and should you), and what are the most common mistakes to avoid?
Here, we lay it all out, with advice and tips from the professional epoxy coating team at Top Coat Concrete.
How to Choose the Best Epoxy Paint or Coating Product
Here’s the first thing to know about applying an epoxy coating to your concrete floor: you probably don’t want actual epoxy – you want a polyaspartic coating.
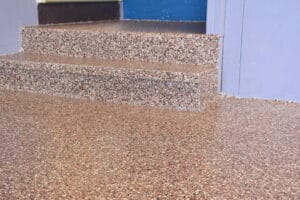
Epoxy coatings were the most common concrete floor coatings twenty years ago. Today, they’ve been replaced by polyaspartic coatings, which are incredibly durable but have a tiny amount of flexibility to accommodate the small movements of concrete slabs between seasons and with changing temperatures. This helps them stand up over longer periods of time with a much lower risk of cracks forming due to fluctuations in the underlying surface.
Polyaspartic coatings are also UV-resistant, meaning they will not yellow from exposure to the sun; this is a recognized problem with many epoxy coatings.
Finally, polyaspartic coatings dry quickly, allowing for a second coat or a clear coat to be applied on the same day. Polyaspartic coatings are fully cured within 48 hours after application. Epoxy flooring can take seven days to fully cure.
Garage Floor Epoxy Coating Steps
The key to dependable epoxy flooring is prep work. Prep, prepare, and preparation!
Skipping the basics when you install epoxy flooring is the number one reason we see epoxy floor projects fail – and we get called out to remedy them with a professionally finished floor.
For beautiful epoxy floors or polyaspartic floors that will stand the test of time, here are the steps professional epoxy installers follow, and you can too for a picture-perfect finish.
1. Remove all objects and sweep the floor to remove bulk debris and dirt
To begin, remove all objects from your garage and garage floor. Don’t take the lazy way: moving objects around while you’re applying epoxy to sections of your garage floors simply won’t work.
At Top Coat Concrete, we generally don’t include moving or storage services as part of a standard coating, but for an additional fee we can move your belongings into another space, into your driveway or yard, or into a storage trailer. We can provide this temporary storage trailer for an additional fee.
2. Prepare the garage floor with a grinder
Before applying epoxy, we grind all floor surfaces to achieve a 20- to 50-grit profile – that even includes brand new concrete.
Grinding the concrete does three things that will make your polyaspartic or epoxy application successful:
- It creates a slightly rough “tooth” to which the epoxy coating can adhere. Imagine applying paint to a smooth mirror versus a piece of wood: to which will it “stick” better? The rougher surface!
- It opens the pores in the concrete, again, improving the surface for better adhesion.
- It also cleans the floor and cuts away dirt or oil stains. This is particularly helpful in older garages – un-remedied oil stains can impact the epoxy coating’s adhesion, too.
While you might use a hand grinder (wear safety glasses and be ready for a day of back-breaking labor) on a DIY project, we use a heavy 25-inch grinder that can grind a garage floor in an hour or two.
3. Repair cracks and divots
Next, we spend time addressing cracks, divots, or worn spots in the concrete. This involves cutting around the damage, removing and cleaning the area with a grinder or stiff bristle brush, then applying a fast-drying polyurea filler. This formula dries very quickly, and we can apply epoxy or polyaspartic over top within the same day.
For large patches, we may need to use a cement-based filler, which can require an extra day of drying time.
4. Sweep and clean the floor
Now it’s time for a closer cleaning. We clean the floor, including edges, with a powerful vacuum to remove bulk and smaller dirt and dust that can remain in difficult-to-reach cracks or crevices.
Removing dust is another important factor in achieving proper epoxy adhesion to the concrete.
5. Apply a base coat
The time has finally come! We prepare our epoxy mixture (or polyurea for base coat), and begin applying.
If you’ve used a pressure washer in your cleaning, or used water of any kind, you must allow the whole floor to dry completely before moving on to applying the epoxy mix. A floor coating applied to a wet surface simply won’t adhere well.
The moisture content in the concrete must be checked with a moisture reader before applying a coating. Never assume your concrete is dry enough without testing it.
We’ve helped countless homeowners fix issues like this across an entire surface simply because they rushed through the preparation of their garage floor epoxy project and didn’t allow the surface to dry completely.
Follow the manufacturer’s instructions for your epoxy, epoxy paint, or polyaspartic coating (again, we use polyaspartic almost exclusively). Most homeowners will want to use a roller brush on a pole for their first coat of epoxy on a garage floor – professionals often use a large squeegee and rollers. Either way, it’s important that your base coat of epoxy flooring goes across the entire floor in one coat; you don’t want to turn one coat into two sections that dry at different times.
For your wet edge at the corners of the room, you may want to apply painter’s tape or duct tape just above where the epoxy meets the wall to ensure a clean, crisp edge and tight corners.
This is also where we may apply decorative elements like color flakes, metallic pigments, and other anti-slip additives.
Let the first coat dry.
6. Apply a second coat or clear coat
For polyaspartic coatings, we apply a second coat or a clear coat over top of the base coat.
Use the same method as your first coat when applying the second coat.
7. Let dry!
Let it dry!
For most epoxies, you can begin walking on the surface after 48 hours, but the product won’t fully cure for another week or so. Don’t move vehicles or heavy furniture back in until the surface is fully cured.
For polyaspartic coatings, curing is complete after 48 hours and you can move back in!
Mistakes to Avoid With a DIY Epoxy Floor
The most common mistakes we see when we get called out to fix someone’s poor epoxy job involve poor preparation.
- Not grinding the floor enough for good adhesion.
- Applying over top of moisture. For basements in particular, you must spend time drying the underlying concrete floor.
- Not mixing the coatings long enough. With a poor mix of the epoxy kit, you may have streaks that never harden!
- Mixing the epoxy too fast introduces bubbles, which can remain in the epoxy coating. The small bubbles look unsightly from the get-go, but they also eventually break, producing divots in your otherwise beautiful epoxy garage floor.
- Sloppy edge work can make a job look terrible. Wear rubber gloves and apply the epoxy slowly right up to the edge, even using a hand brush or brush attachment, deploying painter’s tape to produce a crisp, precise edge where necessary.
The worst DIY project we ever saw? We visited a home where the owner had tried to do their own epoxy floor paint. When we arrived several weeks later, the entire floor was in such bad shape you could roll the paint right off with your foot! This homeowner had done zero prep work and probably applied the paint to a moist surface. Because they tried to save money by going DIY, they ultimately wound up wasting more time and money when the work needed salvaging.
DIY Vs. Professional Application
While epoxy or resin based paints can be a great DIY project for homeowners who pay close attention to detail, we find that most people who care strongly about their garage floor will be better off with a professional application. There are a few reasons for this:
- Over-the-counter epoxy products are often inferior to professional or commercial-grade coatings that we can purchase directly from manufacturers. Not only are products from the big box stores not as durable, but homeowners don’t always know WHAT to buy – polyaspartic is generally the right solution when they think they want an epoxy garage floor. Floor paints, resin based coatings, epoxy paints, and other alternatives simply won’t hold up as well over time.
- We have years of experience applying these coatings, and we know how to install epoxy flooring to avoid potential problems down the road. Again, a perfect epoxy coating is all about good preparation.
- We have the right equipment. A professional floor grinder, for example, significantly accelerates the floor coating process compared to a hand-grinder or DIY alternatives.
Question? We’d love to help! If you’re looking for an epoxy garage floor coating in or near Pittsburgh, we’d love to give you our advice on your garage floor (even if we don’t work together!) and a free quote.
Call to schedule a free epoxy floor appointment.
FAQs About Epoxy Coatings
How long does an epoxy garage floor take?
Professionals will require at least two days to apply a true epoxy, and you should plan for another 7 days for the epoxy to be fully cured before returning to heavy foot traffic.
How long does a polyaspartic floor coating take?
Polyaspartic floors can usually be applied in one day and will be fully cured after 48 hours.
How long will epoxy last?
An epoxy garage floor can last for 10 to 20 years depending how heavily it’s used. Expect some repair work or a new coating at some point.